1. What the extension does
When you create an archive through the Pemarks application, Pemarks sends its own browser to load the page from scratch.
That works well for public content, but it means the archiver does not have your session cookies, your login,
or the exact rendered state you see in front of you.
The Live Capture Companion solves this. It captures the page as rendered in your browser --
with your authentication, your cookies, your scroll position, and the exact DOM state in front of you --
and sends it to Pemarks for archival. This makes it ideal for:
- Authenticated pages behind login walls
- Time-sensitive content that may change or disappear within minutes
- Personalized dashboards and user-specific views
- Pages that block automated bots but render normally in your browser
After the initial capture, your browser stays connected to Pemarks through a live channel.
When the server needs additional resources (images referenced in CSS, web fonts, SVG files), it asks
your browser to fetch them using your existing cookies and cache. This produces higher-fidelity
archives than the server fetching resources independently.
2. Installation
The Live Capture Companion is available from the Chrome Web Store.
Open the Chrome Web Store and search for Pemarks Live Capture Companion, or follow the direct link from the Pemarks application.
Click Add to Chrome and confirm the permissions dialog. The extension requires access to the active tab content during capture and network activity for evidence collection.
Once installed, the Pemarks icon appears in your browser toolbar. If it is hidden behind the extensions puzzle icon, click the puzzle piece and pin Pemarks for quick access.
3. Getting started
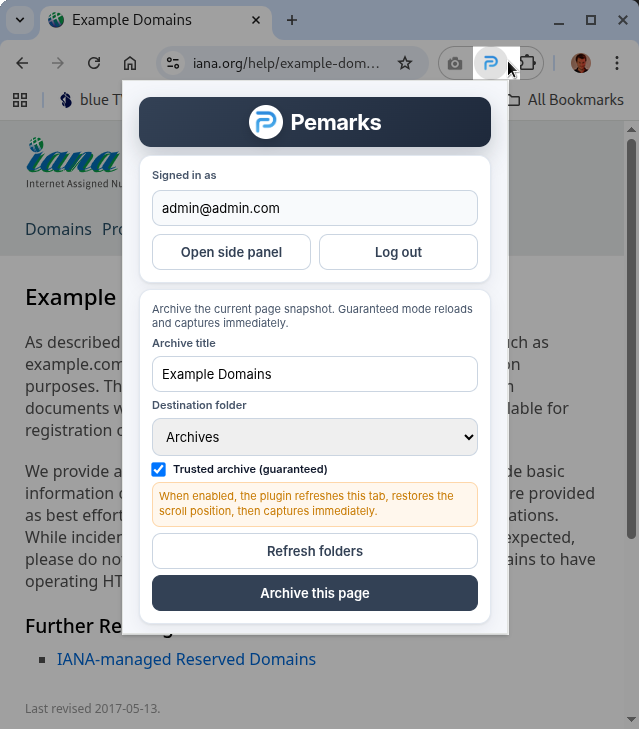
Click the Pemarks icon in the toolbar to open the popup panel. If this is your first time, you will see a login form.
Enter your Pemarks server URL (if not pre-configured), your email address, and your password. Click Login.
Once authenticated, the popup switches to the archive panel. You will see the current page title pre-filled as the archive title, a folder selector, and the capture mode toggle.
Edit the archive title if needed, choose the destination folder, select your preferred capture mode, and click Archive This Page.
The extension remembers your login session and last-used folder between browsing sessions, so subsequent captures are even faster.
4. Capture modes
The extension offers two capture modes. Both produce a full Pemarks archive; the difference is the strength of the accompanying evidence package.
Standard capture
Fast, lightweight capture of the current page state.
- Captures the DOM snapshot and screenshot
- No page reload required
- Best for rapid reaction when speed matters most
- Archive banner shows in red
Guaranteed capture
Evidence-grade capture with full network forensics.
- Reloads the page to collect fresh network evidence
- Captures HAR (HTTP Archive) and netlog
- Generates a PDF of the rendered page
- Ignition TSA timestamp before reload
- Archive banner shows in blue
Use Guaranteed capture when the archive may need to withstand scrutiny -- for legal,
compliance, or investigative purposes. Use Standard capture when you need to preserve
something quickly and can always create an additional guaranteed capture later.
5. Following progress
After you click Archive This Page, the popup shows a real-time progress display.
The extension icon badge also changes color to reflect the current stage:
- Blue -- the extension is capturing the page (DOM, screenshot, network evidence)
- Orange -- the capture has been uploaded and Pemarks is processing the archive on the server
- Green -- the archive is ready
- Red -- an error occurred
Keep the tab open while processing is in progress. This allows Pemarks to request additional resources through your browser if needed.
Once the archive is ready, the popup shows a completion screen with links to open the archived page or navigate to the folder in the Pemarks workspace.
6. The side panel
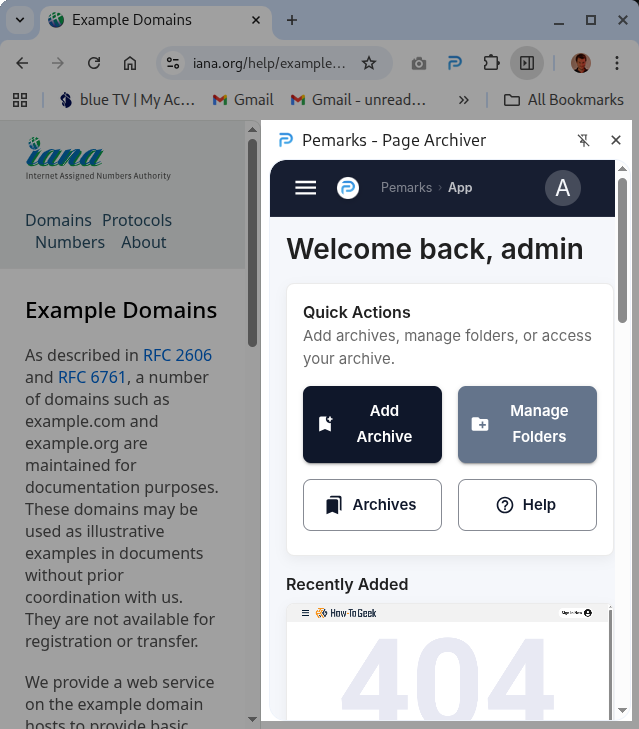
The extension includes a side panel that embeds your Pemarks workspace directly in the browser.
From the completion screen, you can open the side panel to browse the folder where your archive was stored,
or navigate to your subscription and billing settings.
The side panel provides quick access to your archive library without switching to a separate browser tab.
7. How it works under the hood
When you trigger an archive, the extension performs several steps behind the scenes:
-
DOM materialization -- The extension traverses the page, materializes runtime-generated CSS
(including shadow DOM component styles), serializes adopted stylesheets, and captures the complete DOM snapshot.
This mirrors what the Pemarks server does with its own browser, ensuring consistent archive fidelity.
-
Screenshot capture -- A visible-viewport screenshot is taken via the Chrome extension API.
-
Upload -- The snapshot, screenshot, and (for Guaranteed mode) network evidence artifacts are uploaded
to the Pemarks backend.
-
Resource bridge -- A WebSocket connection is established between your browser and the server.
As Pemarks processes the archive, it may ask for additional resources. The extension fetches them from the page
context using your browser's cache and cookies, then relays them back.
-
Completion -- Once all resources are archived and URLs rewritten, the archive reaches the ready state.
For Guaranteed capture, an additional ignition step requests a TSA timestamp before reloading the page,
and a CDP (Chrome DevTools Protocol) session records full network evidence during the reload.
8. Plan requirements
The Live Capture Companion requires a subscription plan that includes the browser extension entitlement.
Currently, that starts at Field Notes ($9/month).
If your current plan does not include the extension, the popup will show a clear message with a link to upgrade your subscription.